


Nathan III
Apprentice
Make an iPod in Photoshop!
Part one
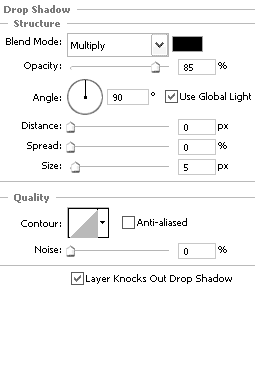
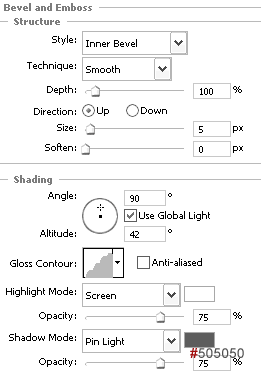
Make a new 275pixel x 400 pixel image, with a white background. Create a new layer, titles iPod shape, or whatever you wish to call it. Using the Rectangular Marquee tool, select the size of the iPod. To set the rounded edges, go to select, modify, smooth, and enter an amount of 12. Then fill in the selection in WHITE, and right click on the lay and select BLENDING OPTIONS. Use these settings for drop shadow, Inner shadow, and Bevel & Emboss.
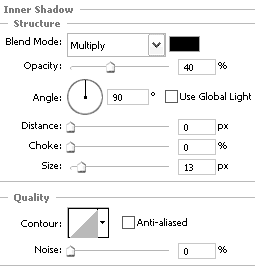
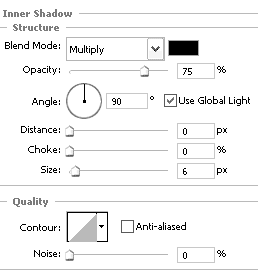
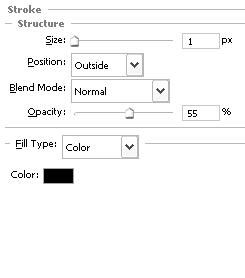
Now create a new layer, called Screen. Using the rectangular marquee tool, create a selection, the size you want the screen to be. Smooth the selecting, by going to select, modify, smooth, and enter 8 for the amount. Fill the selecting in with #dddddd, right click on the layer, and click Blending Options. Use these settings for inner shadow and stroke.
Your iPod should look something like this;
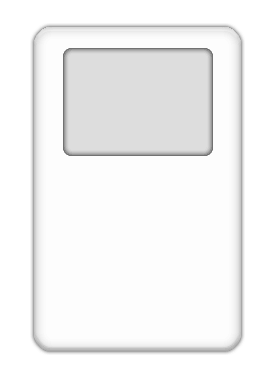
Make an iPod in Photoshop!
Part two
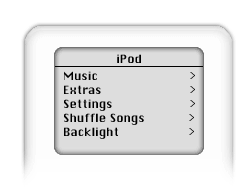
Using the CHIGAGO font, type iPod on the screen. Then using the line tool, or a steady hand with the pencil tool, create a line direclt below the text, the full width of the screen. Now using the same method, create a menu which looks something like this:
5. Next it's time to create the famous iPod clickwheel. Create a new layer titled Clickwheel, then using the Elliptical Marquee Tool, create a selection below the screen while holding down the Shift key to create a perfectly round circle. Fill the selection in with color #dddddd. Another button needs to be created for the center of the clickwheel. So create a new layer titled Clickwheel Button. Using the Elliptical Marquee Tool again, create a selection in the center of the clickwheel and fill it in white as shown below.
Now to make the iPod Click Wheel. Make a new layer, titled what you want, then using the Elliptical Marquee tool, make a new selecting below the screen, at the same time, holding down SHIFT on your keyboard. This will create a perfectly round circle. Fill the selection in with the color #dddddd.
Another button needs to be created for the center of the Click Wheel. So lets create a new layer, called whatever you want. Using the Elliptical Marquee Tool, create a selection in the middle of the Click Wheel, and fill it in white as shown below:
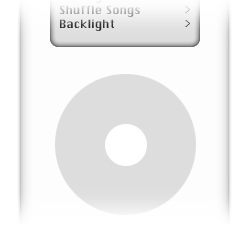
The Click Wheel text needs to be added. Using the ARIAL font, Type MENU at the top of the Click Wheel. For the rest of the buttons, use the Webdings font. To make the buttons, here are the keys for each symbol.
9 = Backwards
4 = Play
; = Pause.
For the forwards button, just duplicate backwards, go to Edit, Transform, Flip horizontal, then just move this lay to the other side of the Click Wheel. Add a pause button on the iPod screen if you want.
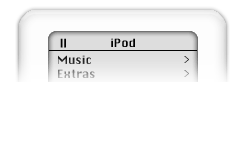


Now for the finishing touches. The battery level is missing Ok, create a new layer, called whatever you want, using the Rectangular Marquee Tool, make a selecting of the shape for the base of the Battery, Then in the Tool Options Bar, at the top of the screen, Add to selection, or press Shift, and click where you add. Now fill it in with #dddddd, now right click on the layer, and click Blending Options. At a 1pixel Black Stroke, leaving all other settings off. To create the level indicator thing, create another lay called whatever you want. Again. Zoom in about 1000%, and then using the Rectangular Marquee Tool, create a new selecting inside the battery shape, leaving about 2 pixels around it, now fill it in black.
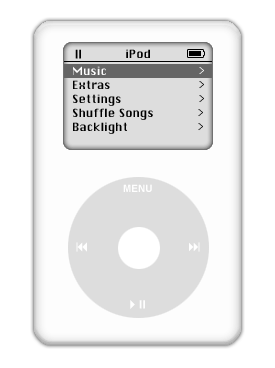
Well done! You're done! Your iPod should look something like this!
Any problems/errors/grammar mistakes? Post here, and I'll fix it!
Hope this helped you,
Nath
Part one
Make a new 275pixel x 400 pixel image, with a white background. Create a new layer, titles iPod shape, or whatever you wish to call it. Using the Rectangular Marquee tool, select the size of the iPod. To set the rounded edges, go to select, modify, smooth, and enter an amount of 12. Then fill in the selection in WHITE, and right click on the lay and select BLENDING OPTIONS. Use these settings for drop shadow, Inner shadow, and Bevel & Emboss.
Now create a new layer, called Screen. Using the rectangular marquee tool, create a selection, the size you want the screen to be. Smooth the selecting, by going to select, modify, smooth, and enter 8 for the amount. Fill the selecting in with #dddddd, right click on the layer, and click Blending Options. Use these settings for inner shadow and stroke.
Your iPod should look something like this;
Make an iPod in Photoshop!
Part two
Using the CHIGAGO font, type iPod on the screen. Then using the line tool, or a steady hand with the pencil tool, create a line direclt below the text, the full width of the screen. Now using the same method, create a menu which looks something like this:
5. Next it's time to create the famous iPod clickwheel. Create a new layer titled Clickwheel, then using the Elliptical Marquee Tool, create a selection below the screen while holding down the Shift key to create a perfectly round circle. Fill the selection in with color #dddddd. Another button needs to be created for the center of the clickwheel. So create a new layer titled Clickwheel Button. Using the Elliptical Marquee Tool again, create a selection in the center of the clickwheel and fill it in white as shown below.
Now to make the iPod Click Wheel. Make a new layer, titled what you want, then using the Elliptical Marquee tool, make a new selecting below the screen, at the same time, holding down SHIFT on your keyboard. This will create a perfectly round circle. Fill the selection in with the color #dddddd.
Another button needs to be created for the center of the Click Wheel. So lets create a new layer, called whatever you want. Using the Elliptical Marquee Tool, create a selection in the middle of the Click Wheel, and fill it in white as shown below:
The Click Wheel text needs to be added. Using the ARIAL font, Type MENU at the top of the Click Wheel. For the rest of the buttons, use the Webdings font. To make the buttons, here are the keys for each symbol.
9 = Backwards
4 = Play
; = Pause.
For the forwards button, just duplicate backwards, go to Edit, Transform, Flip horizontal, then just move this lay to the other side of the Click Wheel. Add a pause button on the iPod screen if you want.
Now for the finishing touches. The battery level is missing
Ok, create a new layer, called whatever you want, using the Rectangular Marquee Tool, make a selecting of the shape for the base of the Battery, Then in the Tool Options Bar, at the top of the screen, Add to selection, or press Shift, and click where you add. Now fill it in with #dddddd, now right click on the layer, and click Blending Options. At a 1pixel Black Stroke, leaving all other settings off. To create the level indicator thing, create another lay called whatever you want. Again. Zoom in about 1000%, and then using the Rectangular Marquee Tool, create a new selecting inside the battery shape, leaving about 2 pixels around it, now fill it in black.Well done! You're done! Your iPod should look something like this!
Any problems/errors/grammar mistakes? Post here, and I'll fix it!
Hope this helped you,
Nath


