C
Ch00b@heart
Guest
Hello my name is Austin, and Welcome to my Application about trying to become the next User Educator! I feel that I would be a good pick in being the next "new" educator because I have a brodcasted mind and that alows me to create loads of brilliant Ideas/Guides. Also, I feel that I would be a good Educator for the Sythe Forums because I not only come up with good Tutorials, I'm very good/nice with other people, and getting back to them as fast as possible! So, if I were selected as User Educator I would not only try to create new guides I would also try and be the 1st to help someone out who has a question!
Ok, Lets get started... I hope you Enjoy!
1- How to Install Linux for FREE!
Are you tired of your old Microsoft and searching for somthing new? Then download/Install Linux today with my easy-step-guide! In this guide I'll show you how to download and intall Linux for free as easy as possible.
Step 1- Before we get started, I'm going to need you to download a ISO File for free at WWW.Ubuntu.org . Congradulations the 1st step is complete!
Step 2- Double Click on the "Install" button for Linux that will be found on your desktop
Step 3- A Pop-Up will show asking "What Language", "Where you Live", Etc...

Now we need to "Partition" a Hard Disk for you...
-Note- If you do this part wrong you will destroy your computer, so read carefully.
Step 4- You may either put everything on a CD (Which I recommend) but some people like to do it Manually so I'll explain how to do that.
Step 5- Click on the "Edit Partition" and imput the new size of MB into it, if you create a "New" partition I suggest you stick with 2,000MB no more.

Step 6- You will now be asked to import your old Windows partition witch I hope all of you know how to do. The install will put in all of your old files so no need to worry about downloading it all again.
Step 7- Just create an account and log into the internet and get back on Sythe!
----Congradulations! You've just installed Linux!------
2- How to Switch your Broken LCD Laptop Screen

Step 1- Unscrew the Bezel (Cover)
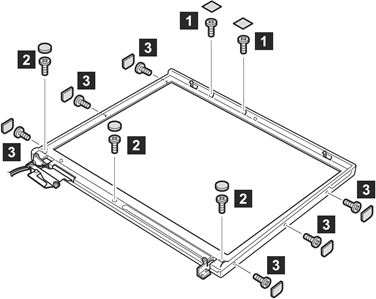
Step 2- Take off the Bezel (Cover) and set it aside
Step 3- Find and Remove the Ribbon Cable that is found on the back of the screen

Step 4- Get your new LCD Screen and Re-connect the Ribbon Cable to it
Step 5- Put back on the screen and Re-Screw the Bezel (Cover)
----Congradulations! A new Screen!!!----
3- How To Create Backup Files
(This is probably the Most simple one...)
For a CD-
Step 1- Go to your "CD-RW Drive (F: )"
Step 2- Find the CD
Step 3- Either Save or Drag your files onto it
Step 4- Remove CD
For a Floppy-
Step 1- Go to your "3 1/2 Floppy (A: )"
Step 2- Find the Floppy
Step 3- Either Save or Drag your files onto it
Step 4- Eject the Floppy
For a Flash Drive-
Step 1- Open up your Flashdrive files
Step 2- Open up the files you want saved
Step 3- Drag over the files to your Flashdrive box
Step 4- Save and Eject
4- Rubber Keyboard Vs. Normal Keyboard
As you all know, most of us are geeks and we want the best items that are out there for our computer to run at top noche. Well, this is bassicaly just a warning on how bad the Rubber Keboard is...
at the tpical pice of 80 dolares tis is a bg rip of! i dnt recmnd it bcus te supid kys dnt wor!!! i m typng ths wih te ruber kybard ad ass yu cn tel it dost tpe vry wel. ths is wy i dnt sugst it to anone!!!
(Typed with a Rubber Key Board)

Now, if you have a rubber keyboard don't get mad at me because I'm just making a point... Even though a rubber keyboard has all the same features as a normal keyboard it just doesn't cut it... and The rubber keyboard being at 80$ and a Normal one being at $40-50 I'm trying to help you save money...
(All words that made sense was typed by a normal keyboard)
5- Getting Passed School "Blocks"
(Once again, Very simple...)
I don't know why chicks love myspace so much. But this is mainly for us who want to play Runescape at school! He He...
Step 1- Find a "Proxy Server" that works...
Letmeonline
kproxy
greatproxy
surfsneak
iphide
Step 2- Type in the Website
Step 3- Play Runescape! (I suggest you keep everything open, some sites don't work if you close stuff)
-Don't Get Caught! or those stupid bastards at school will block it...
_NOTE_ All Pictures were produced by google.
Thank you, and I hope this meets your standards!
-----In this Application I will Be Doing Several Guides/Tutorials...-----
- How to Install Linux for FREE!
- How to Switch your Broken LCD Laptop Screen
- How to Create Backup Files
- Why you shouldn't Get a Roll out Keyboard
- Getting Passed School "Blocks"
Ok, Lets get started... I hope you Enjoy!
1- How to Install Linux for FREE!
Are you tired of your old Microsoft and searching for somthing new? Then download/Install Linux today with my easy-step-guide! In this guide I'll show you how to download and intall Linux for free as easy as possible.
Step 1- Before we get started, I'm going to need you to download a ISO File for free at WWW.Ubuntu.org . Congradulations the 1st step is complete!
Step 2- Double Click on the "Install" button for Linux that will be found on your desktop
Step 3- A Pop-Up will show asking "What Language", "Where you Live", Etc...
Now we need to "Partition" a Hard Disk for you...
-Note- If you do this part wrong you will destroy your computer, so read carefully.
Step 4- You may either put everything on a CD (Which I recommend) but some people like to do it Manually so I'll explain how to do that.
Step 5- Click on the "Edit Partition" and imput the new size of MB into it, if you create a "New" partition I suggest you stick with 2,000MB no more.
Step 6- You will now be asked to import your old Windows partition witch I hope all of you know how to do. The install will put in all of your old files so no need to worry about downloading it all again.
Step 7- Just create an account and log into the internet and get back on Sythe!
----Congradulations! You've just installed Linux!------
2- How to Switch your Broken LCD Laptop Screen
Step 1- Unscrew the Bezel (Cover)
Step 2- Take off the Bezel (Cover) and set it aside
Step 3- Find and Remove the Ribbon Cable that is found on the back of the screen
Step 4- Get your new LCD Screen and Re-connect the Ribbon Cable to it
Step 5- Put back on the screen and Re-Screw the Bezel (Cover)
----Congradulations! A new Screen!!!----
3- How To Create Backup Files
(This is probably the Most simple one...)
For a CD-
Step 1- Go to your "CD-RW Drive (F: )"
Step 2- Find the CD
Step 3- Either Save or Drag your files onto it
Step 4- Remove CD
For a Floppy-
Step 1- Go to your "3 1/2 Floppy (A: )"
Step 2- Find the Floppy
Step 3- Either Save or Drag your files onto it
Step 4- Eject the Floppy
For a Flash Drive-
Step 1- Open up your Flashdrive files
Step 2- Open up the files you want saved
Step 3- Drag over the files to your Flashdrive box
Step 4- Save and Eject
4- Rubber Keyboard Vs. Normal Keyboard
As you all know, most of us are geeks and we want the best items that are out there for our computer to run at top noche. Well, this is bassicaly just a warning on how bad the Rubber Keboard is...
at the tpical pice of 80 dolares tis is a bg rip of! i dnt recmnd it bcus te supid kys dnt wor!!! i m typng ths wih te ruber kybard ad ass yu cn tel it dost tpe vry wel. ths is wy i dnt sugst it to anone!!!
(Typed with a Rubber Key Board)
Now, if you have a rubber keyboard don't get mad at me because I'm just making a point... Even though a rubber keyboard has all the same features as a normal keyboard it just doesn't cut it... and The rubber keyboard being at 80$ and a Normal one being at $40-50 I'm trying to help you save money...
(All words that made sense was typed by a normal keyboard)
5- Getting Passed School "Blocks"
(Once again, Very simple...)
I don't know why chicks love myspace so much. But this is mainly for us who want to play Runescape at school! He He...
Step 1- Find a "Proxy Server" that works...
Letmeonline
kproxy
greatproxy
surfsneak
iphide
Step 2- Type in the Website
Step 3- Play Runescape! (I suggest you keep everything open, some sites don't work if you close stuff)
-Don't Get Caught! or those stupid bastards at school will block it...
_NOTE_ All Pictures were produced by google.
Thank you, and I hope this meets your standards!


 Good luck getting user educator.